How to Add a Banner to Your Blog using Gimp and Blogger
A few weeks ago, I blogged about a program I discovered quite by accident, called Gimp. It's a free and versatile graphics manipulation package that is quite handy if you want to create your blog banner - and I'll be showing you how to do just that today.
I am using the Windows version of GIMP and must admit that this is my first attempt to use it (I normally use Photoshop CS3 for my design business). But it's so easy to use that I was able to do it without any problem, although I don't know the shortcut commands or the MAC commands. This is a fairly long tutorial, so bear with me, as it has taken some time to put together and you'll find I've tried to be as thorough as I could. Just go slowly and if you miss a step or get confused, back up and read through it again. If you're still unable to get it, try emailing me. Also, please note that you can click on each photo to enlarge it to 700 pixels if you can't read it.
Step One: Create a New Document
Open your GIMP program and select File > New.
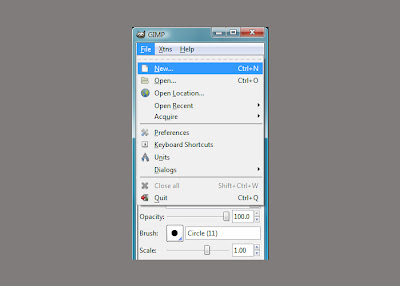
Most Header sizes vary between 660 and 800 pixels wide, but for training purposes, I am creating this at 660 pixels wide and 250 pixels tall to fit on my blogger test site. Click "ok" when you've set your banner size. On GIMP, the resolution is preset to 72px (which is best for web graphics) and RGB color, which is exactly what you want, so you won't need to mess with the advanced settings.

Step Two: Adding a Photo
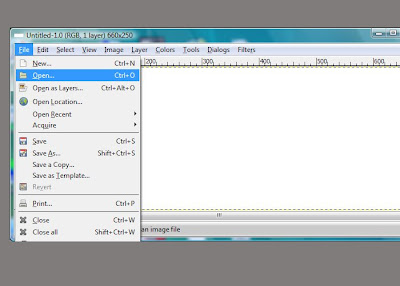
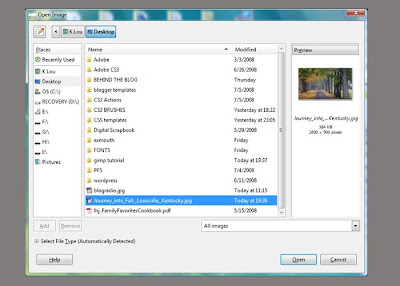
Now that you have a blank canvas, I'll show you how to add a photo (you can also play around with the graphics/paint editors on GIMP, but to save time, we're going to do a photo). On your blank canvas, select File > Open and you will now want to search your computer file for your photo.
Then you'll select it:
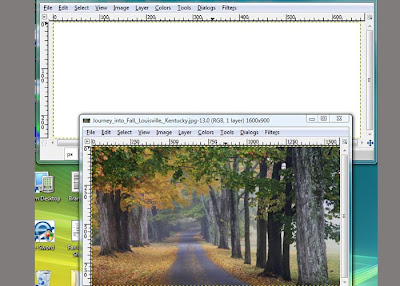
Now your screen should have two windows open and look something like this:
Step Three: Edit and Move Image
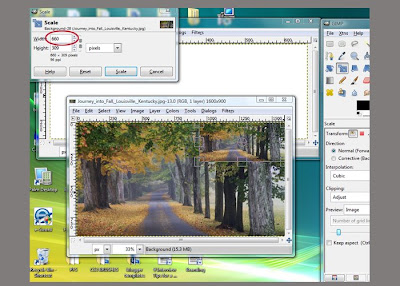
This photo is very large at 1600px by 900px, so we'll need to resize it and move it to our Header file. Click on the photo that you are resizing and then go to the GIMP control panel and select "Scale":
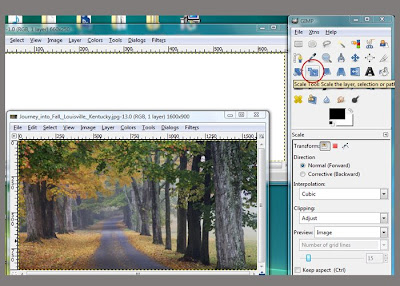
Click on the bottom left corner of the photo that needs to be resized and a scale menu will pop up on the top - this is where you will resize width (don't worry so much about the height, unless you want to crop some of the photo). Our Header is 660px wide and I'm not going to worry about the height, I can position it however I want on the new layer.
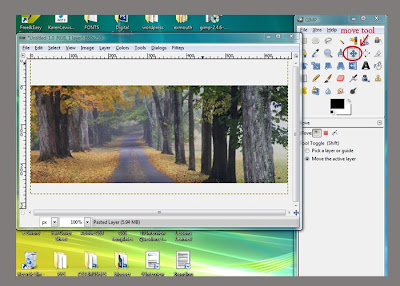
Once your photo is resized, you need to select it by clicking on it, then hit "CTRL-X" to cut it out of that layer, then go up to your Header layer and place the cursor in the center and hit "CTRL-V" to paste it on the Header layer. You may then use the cursor to position it where ever you like.
Step Four: Add Text
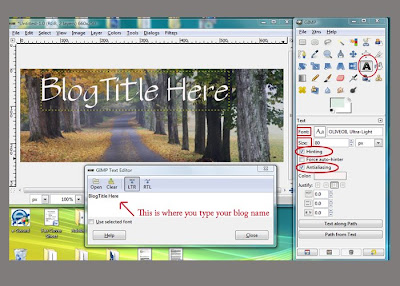
Go back to the GIMP control Panel and click on the letter "A", which is the text editor. You may select your font, font size and color based on what your photo is. Feel free to play around with it and make it unique. One note of caution - if you have a dark photo, use a light color for your words, and vice versa if you have a white background - you need to choose something dark as it's much easier on your reader. Be sure to check the little boxes beside "hinting" and "anti-aliasing", as those make the font appear smooth. You may also move the location of your text by utilizing the move button as you did with the photograph.
Step Five: Saving Your File
You'll need to save the file to your desktop or another folder for easy location when you get ready to install it on your blog. Click File > Save as
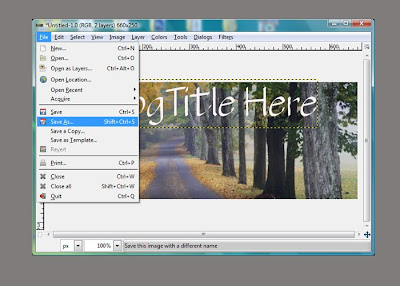
Then name your file - mine is called "blog header sample". Note that you need to save it as a .jpeg file, then click on "save".
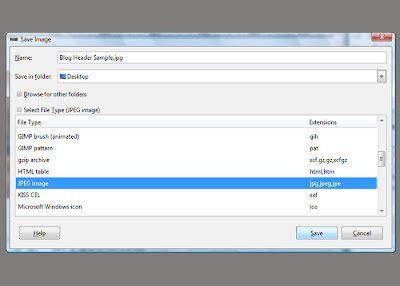
GIMP will tell you that your image should be exported before it can be saved as a jpeg, so click on "Export" and then "ok". Check your folder for the saved image - and once you locate it, you're ready to move on to installing the header.
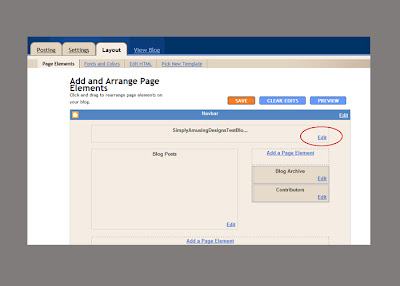
Step Six: Installing the Header
If you are not using New Blogger or page elements, you'll need to choose a photo hosting site. There are plenty of free sites, but Photobucket is the one most people turn to. Simply follow their instructions to sign up for your account and then upload your photo there. Since every site is different, I can't tell you how to do that step by step, but it's very simple and if you encounter any difficulty, you can contact their help desk.
If you are using New Blogger, you do not have to host your new banner, you may skip that step.
Go to your Layout or Template tab and select "edit" on your header box.
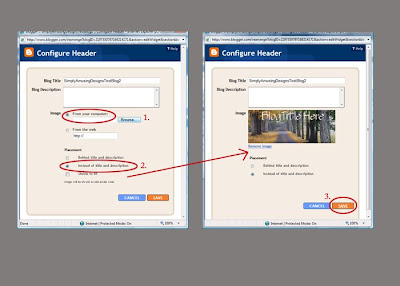
Browse your computer for the image you saved earlier and select it. Click on the radial button that says "instead of title and description" - this will ensure the new banner replaces the text currently in your header. Then save.
If you view the blog now, you'll notice the lines are still around the banner, so next we'll need to go into the template and edit the html.
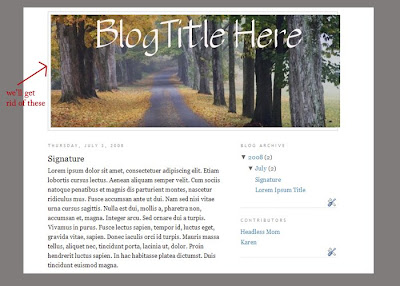
Before you edit anything, be sure to back up your template by clicking on the link that says "Download full template" and saving it to a location you can easily find again. Then, scroll down (or select "CTRL + F" for the find function and enter the word "border" and next) until you see the following:
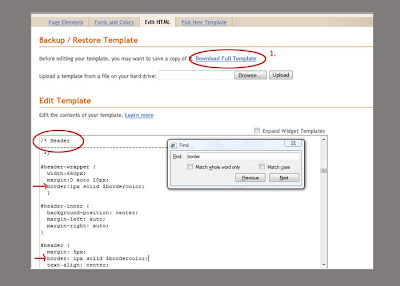
Note the red arrows by the word "border:" and replace the "1" px with a "0" in both places to remove the borders. Save the template at the lower right hand and now you should have this:
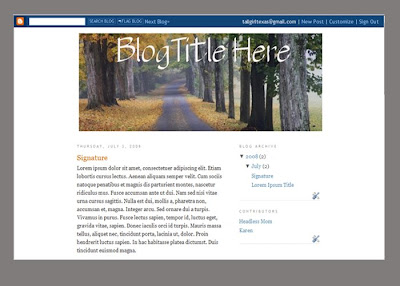
And there you have it - your very own custom made banner - made by you for free.
Works for Me! If you think this would help others, please feel free to digg, kirsty or stumble it below.


Look on the bright side! Subscribe via RSS.
I am using the Windows version of GIMP and must admit that this is my first attempt to use it (I normally use Photoshop CS3 for my design business). But it's so easy to use that I was able to do it without any problem, although I don't know the shortcut commands or the MAC commands. This is a fairly long tutorial, so bear with me, as it has taken some time to put together and you'll find I've tried to be as thorough as I could. Just go slowly and if you miss a step or get confused, back up and read through it again. If you're still unable to get it, try emailing me. Also, please note that you can click on each photo to enlarge it to 700 pixels if you can't read it.
Step One: Create a New Document
Open your GIMP program and select File > New.

Most Header sizes vary between 660 and 800 pixels wide, but for training purposes, I am creating this at 660 pixels wide and 250 pixels tall to fit on my blogger test site. Click "ok" when you've set your banner size. On GIMP, the resolution is preset to 72px (which is best for web graphics) and RGB color, which is exactly what you want, so you won't need to mess with the advanced settings.

Step Two: Adding a Photo
Now that you have a blank canvas, I'll show you how to add a photo (you can also play around with the graphics/paint editors on GIMP, but to save time, we're going to do a photo). On your blank canvas, select File > Open and you will now want to search your computer file for your photo.

Then you'll select it:

Now your screen should have two windows open and look something like this:

Step Three: Edit and Move Image
This photo is very large at 1600px by 900px, so we'll need to resize it and move it to our Header file. Click on the photo that you are resizing and then go to the GIMP control panel and select "Scale":

Click on the bottom left corner of the photo that needs to be resized and a scale menu will pop up on the top - this is where you will resize width (don't worry so much about the height, unless you want to crop some of the photo). Our Header is 660px wide and I'm not going to worry about the height, I can position it however I want on the new layer.

Once your photo is resized, you need to select it by clicking on it, then hit "CTRL-X" to cut it out of that layer, then go up to your Header layer and place the cursor in the center and hit "CTRL-V" to paste it on the Header layer. You may then use the cursor to position it where ever you like.

Step Four: Add Text
Go back to the GIMP control Panel and click on the letter "A", which is the text editor. You may select your font, font size and color based on what your photo is. Feel free to play around with it and make it unique. One note of caution - if you have a dark photo, use a light color for your words, and vice versa if you have a white background - you need to choose something dark as it's much easier on your reader. Be sure to check the little boxes beside "hinting" and "anti-aliasing", as those make the font appear smooth. You may also move the location of your text by utilizing the move button as you did with the photograph.

Step Five: Saving Your File
You'll need to save the file to your desktop or another folder for easy location when you get ready to install it on your blog. Click File > Save as

Then name your file - mine is called "blog header sample". Note that you need to save it as a .jpeg file, then click on "save".

GIMP will tell you that your image should be exported before it can be saved as a jpeg, so click on "Export" and then "ok". Check your folder for the saved image - and once you locate it, you're ready to move on to installing the header.
Step Six: Installing the Header
If you are not using New Blogger or page elements, you'll need to choose a photo hosting site. There are plenty of free sites, but Photobucket is the one most people turn to. Simply follow their instructions to sign up for your account and then upload your photo there. Since every site is different, I can't tell you how to do that step by step, but it's very simple and if you encounter any difficulty, you can contact their help desk.
If you are using New Blogger, you do not have to host your new banner, you may skip that step.
Go to your Layout or Template tab and select "edit" on your header box.

Browse your computer for the image you saved earlier and select it. Click on the radial button that says "instead of title and description" - this will ensure the new banner replaces the text currently in your header. Then save.

If you view the blog now, you'll notice the lines are still around the banner, so next we'll need to go into the template and edit the html.

Before you edit anything, be sure to back up your template by clicking on the link that says "Download full template" and saving it to a location you can easily find again. Then, scroll down (or select "CTRL + F" for the find function and enter the word "border" and next) until you see the following:

Note the red arrows by the word "border:" and replace the "1" px with a "0" in both places to remove the borders. Save the template at the lower right hand and now you should have this:

And there you have it - your very own custom made banner - made by you for free.
Works for Me! If you think this would help others, please feel free to digg, kirsty or stumble it below.
Look on the bright side! Subscribe via RSS.


Comments
I would so love to try to do this but is there some sort of undo button in case I royally mess up?
Me and computers have a very love hate relationship.
Thank you for all the time you took on this post. Wow.
I stumbled ya, my friend.
I can't actually believe *I* made a banner :)
Come see
http://francoisfamily.blogspot.com/
http://thereshegrows.blogspot.com/
It has helped alot!!
You are a genius!
I really can't thank you enough!!!
My blog looks perfect now.
Best regards, Rosemary
Thank you!